
So after that rather boring lecture about tools & materials in part 1 here are some more interesting ‘in progress’ pictures. Hopefully this should display as a gallery with the instructions as captions to each picture *fingers crossed*.
-

- Virgin Cork Bark – If you don’t want rock faces to your hills you can basically just stick the styrofoam straight to the MDF, mark out the hill shapes and cut out… but they don’t look half as interesting ;)
-
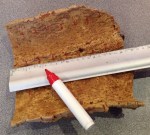
- Mark out with steel rule & chunky pen – I’m using 1inch/25mm thick styrofoam hence marking out horizontal line that distance apart
-
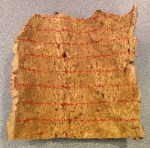
- Line-ey – Here is the back of the bark all marked up
-
- Fretsaw – now cuting along the lines using my fretsaw, again using a jigsaw or handsaw would work just as well
-
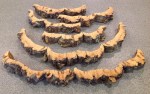
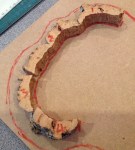
- Rock Faces – Tadaa already you can see miniature rock faces rather than strips of bark. The texture of cork bark is amazing!
-

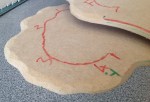
- Layout – Now layout the rock faces into interestingly shaped hills and draw around them with your chunky marker. There are three basic hill shapes – Oval, Kidney and Number 8. Generally I wouldn’t make a terrain piece much over 12″ in either direction but these hills are a special exception to that rule, and hey if there too large I can always cut them in half later ;)
-
- Outline Cork – Once your happy with your layout draw around your rock faces so you can reposition them later. It’s also worth numbering/lettering the component parts so you can put them back in the same place later
-

- Number positions – You also need to number the bases for matching up later
-

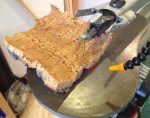
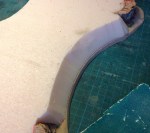
- 30 degrees – I’ve found through trial and error that the optimum angle for a stepped hill edge is about 30-35 degrees. Any steeper and it looks artificial and any shallower starts affecting gameplay where people want to position models on the slope where they fall over.
-
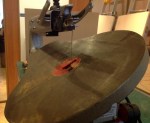
- 30 degrees – Here you can see the angled table in relation to the thin saw blade. It’s worth noting that when working with a table saw you move the piece around the blade, where as with a saw you hold the piece still and move the tool… Not that it makes a difference to the finished piece it just takes some getting used too!
-

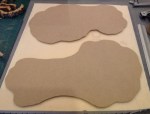
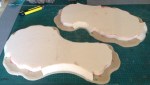
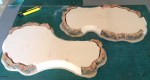
- Cut out bases – As you can see you don’t need to be too accurate at this stage as there is still plenty of flexibility to adjust to it. Note how I’ve cut outwards from the line, this makes the drawn on side the upper side.
-

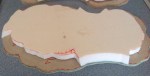
- Angle – Here you can see the cut edge of the base
-
- Styrofoam – Now flip you bases upside down onto your styrofoam sheet
-

- Draw around – the bases with your marker.
-

- Cutout styrofoam – remember to undercut these lines as you are now working from the underside.
-

- Perfect fit – well ish usually at this stage, but being slightly to big at this stage is better as you can cut down. It’s immediately apparent if you’ve cut the styrofoam the wrong way as you’ll have a mirror image of the hill. Don’t panic as you can either just cut out another top and base and make two hills or cut both pieces down and make a smaller hill.
-

- Reposition those rock faces by placing the marked out base next to the styrofoam
-

- Draw around the rock faces with you marker… again ;)
-

- Cut – Now reset your saw for a straight 90 degree cut, and cut along the lines previously drawn. This will create the spaces to insert the rock faces into the hill.
-
- Replace styrofoam onto base lining it up as best you can now that you have missing bits. Sometimes getting the rock faces back can help but I generally do it by eye and fix any fck ups later with more filler ;)
-

- Marker the ends of the rock faces gaps, the arrows really help!
-

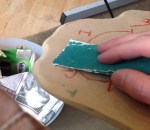
- Now take your craft knife… – This is the point where I say ‘do as I say, not as I do’! With great care and ALWAYS cutting away from yourself, slice slivers off holding the knife at about 60 degrees off vertical around the edge where your rock faces will go. You are trying to take off the top sharp edge to make the base edge rounded. If your knife is jumping and sticking a lot then replace blade as this is the stage when your most likely to maim yourself. Also it doesn’t hurt to do this over a bin, not because the off cut will go into the bin (anything but!) but it shows willing that your at least trying to be tidy if the missus is watching.
-
- Woo no blood! – Having successfully not sliced yourself open your base should now look something like this.
-
- Rounding off – now finish off the rounding process with a bit of rough sand paper, also sand down all the other edges while your at it.
-

- Smooth as a… well a bit of MDF really!
-
- Glue – Now take your hot glue gun (if your impatient like me) or your spreadable glue, and stick the styrofoam down onto the basing. It’s worth noting at this stage that hot glue is hot and is really good at burning your fingers… just saying!
-

- Craft Knife again! – Now take your knife again and slice off any over hanging bits of styrofoam till you have a nice neat hill edge.
-
- Now replace rock faces!
-

- Notation useful! – See now wasn’t that pedantic numbering of components useful ;)
-

- Jiggery pokery! – Now with lots of cutting, adjusting and general Jiggery pokery glue down the rock faces into there appropriate places. This really is the fiddly bit linening up multiple bits of a natural product into a seemless whole. Ok I’m over egging it a bit you can still solve/hide problems later with filler, sand/gravel, paint job, flock and bushes ;)
-
- Ugly sharp edge – now this hard cut edge doesn’t look very natural and is only accentuated later by dry brushing if not removed. So gently (or roughly with a finer grade paper) smooth off this edge with sand paper.
-

- Natural smooth edge – now this may not look like much at this stage but once it’s been textured, painted, dry brushed and then flocked this edge just disappears and the hill just looks a lot more natural for it.
-

- Filler – Now take your white filler and liberally apply it to any cracks between styrofoam, base and rock face. This is also the time to smooth/fill any fck ups you may have made. Leave to dry overnight!
-

- Sanding! – Now take your trusty sand paper and sand smooth any lumpy bits of filler and make a pissing mess in the process. If you haven’t already then you may want to get a Hoover out!
-

- PVA – Now slap your PVA glue onto everywhere that you want texture and pour over your sand/gravel mix. As pictured you will need to do this on top of newspaper not just to stop your table being PVA’d but also so you can easily scoot any excess sand/gravel back into its container. Again leave this overnight to dry!
-

- Finished textured hills!
-

- Finished textured hills! showing nice barky rock faces.
-

- Undercoat – Now if your doing grassy hills you’ll want to undercoat a nice muddy poo brown (because earth is brown and the green grass colour will come from the flock), or as artists call it ‘burnt umber’. Also worth noting is that artists paint tend to be very pigment heavy and stiff, this is good for us cheapskates as water and PVA are cheap. I tend to first add one part PVA to two or three parts paint then dilute with water till it’s gets to a usable gloopyness. This thinning of the paint tend to lighten it slightly but makes little difference to its coverage ;)
-
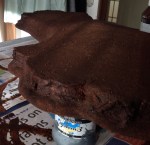
- And sunny action shot! – of your finely crafted poo coloured hill.
Hopefully that was a bit more interesting ;) next time I’ll finish off the painting and detailing.
Cheers
Nick
